
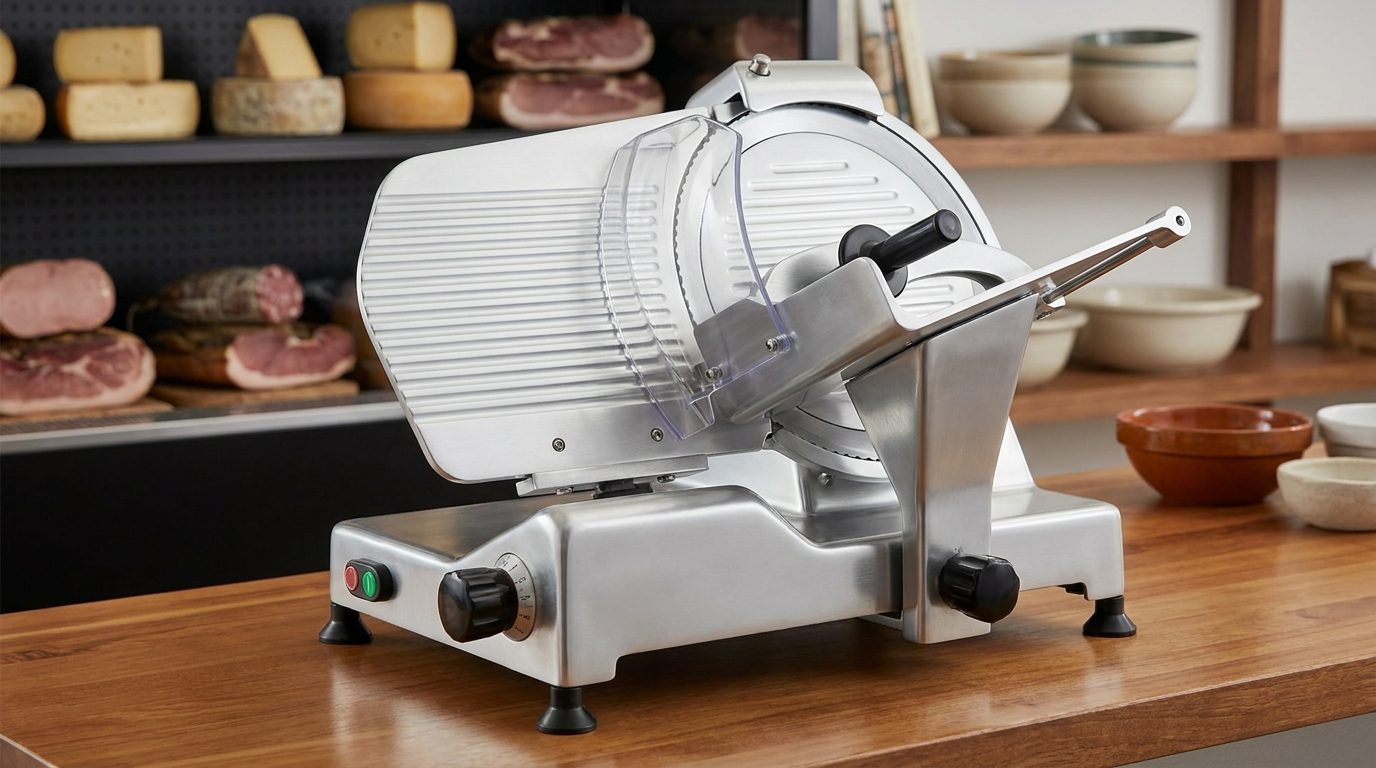
A commercial meat slicer is the most dangerous machine on most prep benches, because the blade is large, exposed at the cutting edge and turning fast enough that contact causes serious injury before anyone can react. Safe operation comes down to a short set of habits: never slice without the food holder, return the thickness gauge to zero every time you stop, and never clean or sharpen the machine while it is connected to power.
This guide covers those habits in the order an operator meets them — setup, slicing, cleaning and sharpening — plus how to choose a machine that is easier to use safely.
Know the parts before you touch the blade
Every safe practice below refers to one of these components, so name them with your team:
- Blade — circular, driven, with the cutting edge exposed at the slicing arc.
- Blade guard / ring guard — covers the section of the edge not in use. It is not optional.
- Gauge plate — the adjustable plate that sets slice thickness and, when returned to zero, shields the edge.
- Carriage and food holder — the sliding tray and the sprung arm or pusher that holds product against the gauge plate.
- Carriage lock — secures the carriage so it cannot slide during cleaning.
- Blade cover and centre plate — removable for cleaning on many models.
- Sharpener — an attachment carrying honing stones that dress the edge.
A machine missing its food holder or blade guard is out of service until the part is replaced. Slicing without them is the most common cause of slicer injuries.
The rules that prevent almost every slicer injury
| Rule | Why it matters |
|---|---|
| Return the gauge to zero whenever you stop | An unattended machine with the gauge open leaves a live edge at hand height |
| Never slice without the food holder | Fingers guiding product directly are inches from a turning blade |
| Never slice the last piece by hand | Feed the end piece with the holder or set it aside for another use |
| Isolate from power before cleaning or sharpening | Removes any possibility of the blade starting while hands are on it |
| Use cut-resistant gloves for cleaning | The blade is at its most exposed when the guard and covers are off |
| Keep the machine and floor dry | Slips are how hands end up where they should not be |
| One trained operator at a time | A second person reaching in is a common near-miss |
| Never wear loose sleeves, ties, wristwatches or jewellery | Anything that can be caught will pull a hand toward the edge |
Two more belong in your kitchen SOP: never leave a running slicer unattended, and never override a guard to make a job faster. If a guard prevents the cut you need, the answer is a different machine or a different preparation.
Setting up for a safe slicing session
- Position the machine on a stable, level bench at a height where the operator's forearm is roughly horizontal. An awkward reach is where control is lost.
- Give it clearance. The carriage needs its full stroke, and the operator needs space to step back.
- Face the machine so the blade is not in a walkway. Nobody should pass behind an operator mid-stroke.
- Chill the product. Firm, well-chilled meat slices predictably; soft product drags, sticks and tempts staff to push it by hand.
- Set thickness before starting, not while the blade is spinning and the carriage is loaded.
- Slice with the carriage, not the wrist. Forcing product into the blade is how it snatches.
- Zero the gauge and switch off between products, not only at the end of service.
Blade diameter — the 220 mm, 250 mm and 300 mm classes seen on machines such as the Industrial Meat Slicer 220mm, Industrial Meat Slicer 250mm and Industrial Meat Slicer 300mm — sets the largest product you can cut across in one pass. Choose the class that suits your biggest product, not the biggest machine you can fit. An oversized slicer on a small bench is harder to position and harder to clean.
The commercial meat slicing and processing range also includes purpose-built machines for specific cuts, such as the Industrial Kottu Cutter / Slicing Machine, which takes over a repetitive job otherwise done by hand at speed.
Cleaning: the highest-risk task on the machine
More slicer injuries happen during cleaning than during slicing, because the guards come off and hands go near the edge deliberately. Follow a fixed sequence and do not shortcut it:
- Switch off and disconnect from power. Not standby — disconnected.
- Return the gauge plate to zero so the edge is shielded as far as the design allows.
- Engage the carriage lock if the machine has one.
- Put on cut-resistant gloves before removing any guard or cover.
- Remove the detachable parts — food holder, carriage, blade cover and centre plate as the design allows — and wash them separately in the sink.
- Wipe the blade from the centre outwards, never along the edge, with the cloth flat against the face.
- Clean, sanitise and dry all food-contact surfaces, including the gauge plate and the area behind the blade where trimmings collect.
- Never hose or submerge the motor housing. Water in the housing is an electrical and a corrosion problem.
- Dry fully, reassemble, refit every guard, confirm the gauge is at zero, then reconnect power.
Standard food-safety practice is to break down and clean a slicer between different products — particularly between raw and ready-to-eat items — and at intervals through a long run, not only at the end of the day. Slicers are a classic cross-contamination point because ready-to-eat products pass over the same blade.
Sharpening and blade condition
A blunt blade is a safety problem, not just a quality one: it drags, staff push harder, and pushing harder is how control is lost. Dress the edge on a schedule rather than waiting for ragged slices.
Sharpen only with the machine's own sharpener attachment, correctly seated, following the manufacturer's hone and deburr sequence. Isolate power when fitting or removing it. Clean the blade before and after sharpening, because grinding swarf on a food-contact surface is not acceptable. Take a chipped, deeply scored or heavily worn blade out of service rather than continuing.
Bones are a different machine and a different hazard
A slicer is for boneless product. Bone destroys slicer blades and deflects unpredictably. Bone work belongs on a purpose-built band saw or bone cutter, with its own guarding, blade tension and push-stick discipline — machines such as the Astar Industrial 1650mm Bone Saw and the Compact Industrial Chicken Bone Cutter 750W sit in that class. Treat band saw training as a separate competency; the hazards and safe stances are not the same.
How to choose a slicer you can operate safely
- Match blade diameter to your largest product, not to the biggest machine available.
- Check that the gauge plate closes fully to zero and that the position is obvious at a glance.
- Confirm the food holder is included and that it grips your typical product properly.
- Look at how few tools cleaning needs. Machines that strip without tools get cleaned properly; machines that need a spanner get wiped instead.
- Check the blade guard and any interlocks function before the machine goes into service.
- Plan bench position, clearance and a dedicated power point before installation.
- Decide who is trained, write the sequence on a card by the machine, and keep it to a named short list of staff.
- Separate raw and ready-to-eat workflows — high-volume sites often run two machines rather than cleaning between every change.
Frequently asked questions
How do I use a commercial meat slicer safely?
Use the food holder for every cut, keep both hands behind the guards, slice with smooth carriage strokes rather than forcing product, and return the thickness gauge to zero whenever you pause. Disconnect the machine from power before cleaning or sharpening, and never remove a guard to speed up a job.
How often should a meat slicer be cleaned?
Break it down and clean it between different products, especially between raw and ready-to-eat items, and at intervals through the day during continuous use rather than only at close. Slicers are a well-known cross-contamination point because every product crosses the same blade.
What safety gear should I use when cleaning a slicer?
Cut-resistant gloves are the key item, because the blade is at its most exposed once guards and covers are removed. Add a waterproof apron for sink work, keep sleeves clear and remove watches and rings. Make sure the machine is disconnected from power before anything comes off.
What size slicer blade do I need?
Blade diameter sets the largest product you can cut across in one pass. A 220 mm class blade suits smaller products, while 250 mm and 300 mm classes handle larger cuts. Choose by your biggest regular product and by the bench space you have, rather than defaulting to the largest available.
Can I slice frozen meat on a commercial slicer?
No. A standard slicer is designed for chilled, firm product, not frozen blocks, and frozen material can damage the blade or cause it to snatch. Partially thaw to a firm-chilled state for clean slicing, or use a machine specifically designed for frozen product.
Who should be allowed to operate a slicer?
Restrict it to a named list of trained staff who have been shown the full sequence, including cleaning, and supervised on the machine. Common practice is to keep slicer and band saw operation to experienced staff and to retrain whenever someone new joins the section.
Where to start
Choose the blade class that matches your product, plan the bench position for clearance and cleaning, and write the operating sequence before the machine arrives. The commercial slicer and meat processing collection covers slicers alongside bone saws and mincers, and the commercial kitchen equipment guide for Sri Lanka shows where the butchery section should sit in the wider kitchen.
Share:
Commercial Vegetable Cutting Machine: How to Equip a Prep Station
Hotel food and beverage equipment list, department by department